Sunday, February 21, 2016

Making Photos Stay in place in Word

Random Text Generator  - RAND FUNCTION


When I want to try something new I hate to try it on my working Document.  Sometimes I'll use a copy of my working document but that gets confusing  at times which document I am working with. I set up a test document. 

I'll Open a new word document and use the  random text generator provided by word.
 Type in =RAND(4,3) the first number "4" inserts 4 paragraphs and the "3" inserts 3 sentences per paragraph.

This will displays general information about word: 4 Paragraphs with 3 Sentences. 


Since we are discussing word formatting I'll use the "old RAND"
=RAND.OLD(4,3) Still 4 Paragraphs, with 3 Sentences) But text that is not confused with real text.


=RAND(20,5) would give 20 paragraphs with 5 Sentences

IMAGES

For this example I used =RAND.OLD(10,10) 10 Paragraphs of 10 Sentences

Showing where I want picture inserted


Picture inserted:


I have some decisions to make:
Photo to big and is beside 2 paragraphs.
I can use the photo "Handles" to re-size or right click on picture and set exact size:


Size set to 1"


Photo is now beside Paragraph 1


Right Click on Picture and select "Text Wrapping" and we see our default was "Tight"
So if we change to "inline" our text goes from beside "tight" to "inline" with sentence

TIGHT:


Inline Wrapping would leave large space on each side
IF we change to Square wrapping:


Tight and Square Wrapping text Whats the difference?
Some images are not square, for example this is a triangle with "Square Wrapping"


The Picture is surrounded "tight" Wrapping. Text close to Picture


Understanding the types of wrapping will help understand picture placements 

Next Captions and making the picture stay where you want it

Note the little Anchor... we will anchor the picture to a paragraph and make it stay where you want it.


Saturday, February 20, 2016

Indexing by Last name

Select Name


Two way to mark an entry for an index 
either 
or I prefer
Alt,shift X
 either will bring up:
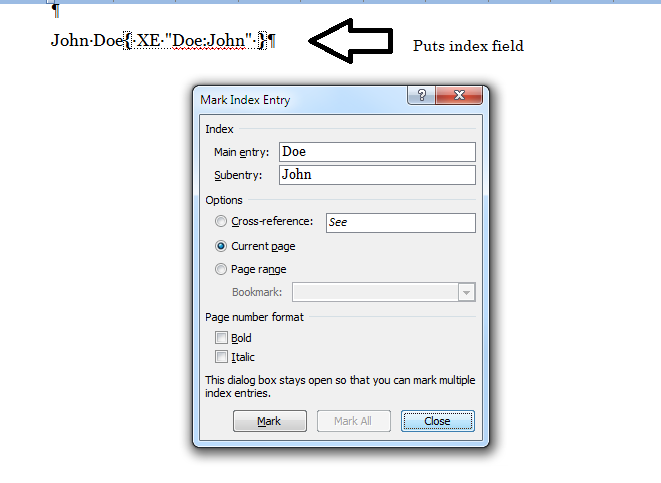
I cut and paste (Cntl x. cntl v) the first name into the sub entry:

Hit Mark

Resist the temptation to "Mark All" Doing so will mark all people named Doe with John.

 If you have a name such as "County State Bank" no need to make sub entry so Mark All is Fine.
 I usually create a separate word document in Paragraph View and paste index entries into it  then just copy from that. 

But most of the time on names its just as easy to mark the name, cntl x (cut) the first name and cntl v (paste) it into sub entry. 

There are other ways using "Quick Parts" Later

To Insert Index 

Under the reference tab , Index section select create index.

I prefer Classic Format but  you can play with other styles and see  how they look in the Print   Preview Viewer.


Select OK
Classic  will look like this:


Indexes Have to be updated as changes are made.
Right click somewhere on Index and select update.


Word Shortcuts

F5

F5 opens "goto" page; If you enter page number 26 you want to go Page 26


Shift F5

Shift F5 takes you to the last place you were editing in the document


Shift F3

Shift F3 Changes Sentence case: How are you?; HOW ARE YOU?; how are you?; How Are You?

Cntl Shift +

Subscripts: to make  something Sub script this is subscript Select text and hit: cntl shift +; to make normal hit: cntl shift +, again.

Move Text

Rather than Cut, paste (cntl x, Cntl v) you can move text by highlighting it, selecting F2, placing your cursor where you want it and hitting enter.

Non Breaking Space

To make words stay together than break apart because of a new line you can use "Non- Breaking Spaces"


Switching First and Last Names 

of a List in Word

Here is a List of a few of Illinois First Governors


Select the Names you want to switch:


Open Replace under the Home tab editing and select "Use Wild cards"


Type in Find What (<*>) (<*>)
And in Replace With  \2, \1


Be sure to include the space in the Find and Replace lines

Hit Replace all and list now looks like this with Last name now first:


To now Alphabetize by last name Select the names Then on the Paragraph section of the home tab Select the Sort Button


A Screen will pop up to select how to sort:

Sort by Paragraph and the type is Text
Hit OK and the result is an Alphabetized  by last name list


Thursday, February 18, 2016

Multiple Indexes in Word

Multiple Indexes in Word:
To set up an Index Called "Labels" With a sub heading of "Levees" and "Bridges"with references:
 Select the text you want to bookmark the hit Alt, Shift, X together. The Paragraph markings will appear if not You must show Paragraph marks, Under home tab in the paragraph section select show/hide:


Mark the Entries

The Alt, Shift, X will insert XE (Index Entry) of that word 
For example "Bridges"


and will insert into your document:


You then can edit the XE Fields as such:
This marks the Index called "Labels" with a heading of Bridges with the Location of that bridge

Insert the index


Place cursor where you want index inserted in the document: 
To insert the actual index: Open the Quick Parts Button in the Insert, Text section


 Select Field
Then under field names select Index:
and  Field codes:
Type in the following under Field codes:
Hit Ok
This is how it looks:


Change to  your own labels and headings and add multiple indexes for each section of your document

Update Index

As you make changes and add and remove pages the index does not automatically update. go to your index and right click and select Update Index

Using Auto text function under Quick parts allows you to insert the custom index Index markings and modify as needed.(more Later)

To set up only 1 index just mark the word you want to index with Alt, Shift, X  or the Mark index and  Insert Index under the reference tab.


Don't forget to Update

Indexing by Last name

Select Name 


Two way to mark an entry for an index 
either 
 I prefer
Alt,shift X
 either will bring up:
I cut and paste (Cntl x. cntl v) the first name into the sub entry:

Hit Mark

Resist the temptation to "Mark All" Doing so will mark all people named Doe with John.

 If you have a name such as "County State Bank" no need to make sub entry so Mark All is Fine.
 I usually create a separate word document in Paragraph View and paste index entries into it  then just copy from that. 

But most of the time on names its just as easy to mark the name, cntl x (cut) the first name and cntl v (paste) it into sub entry. 

There are other ways using "Quick Parts" Later